Paying checkpost tax online can save time, reduce paperwork, and help you keep proof of payment ready during an interstate journey. The exact tax name, rate, and portal depend on the state or transport authority, but the overall process is similar.
What is checkpost tax?
Checkpost tax is a state or regional road tax that may apply when a commercial or private vehicle enters or travels through another jurisdiction. It may appear as border tax, entry tax, permit tax, or a similar transport charge. Always check the current requirements for your vehicle type and route before you travel.
Documents and details you may need
- Vehicle registration number and registration certificate details
- Owner, operator, or company information
- Vehicle class, weight, seating capacity, and fuel type, where required
- Driver and route details, including entry and exit dates
- Permit, fitness certificate, insurance, and pollution certificate details, if requested
- A valid mobile number or email address for alerts and the receipt
How to pay checkpost tax online
https://parivahan.gov.in/en/node/579
- Open the official transport or tax portal. Use the website of the relevant state transport department, road tax authority, or government service portal. For India-related vehicle tax services, start with the official Parivahan payment information page. Avoid unofficial links and verify that the web address is correct.
- Choose the checkpost, border tax, or vehicle tax service. Select the service that matches your journey. Some portals ask whether you are paying for a private vehicle, goods vehicle, passenger vehicle, or a temporary permit.
- Enter vehicle and travel information. Provide the registration number, vehicle category, owner details, route, entry date, exit date, and any other required information. Check every field before continuing.
- Review the tax calculation. Confirm the state, checkpost, duration, vehicle class, and amount shown by the portal. If the amount looks incorrect, stop and recheck the details or contact the authority.
- Complete the payment. Use an available method such as UPI, debit card, credit card, or net banking. Do not share your PIN, OTP, or password with anyone.
- Download the receipt or permit. Save the acknowledgement number, transaction ID, and PDF receipt. Keep a digital copy on your phone and, when required, a printed copy in the vehicle.
- Verify the payment status. Use the portal’s payment-status or receipt-verification option if available. A successful bank debit alone is not enough if the portal still shows pending.
What to do if payment fails
First, wait for the portal or bank status to update and do not make repeated payments immediately. Check the transaction history using the acknowledgement number. If the amount was debited but the receipt was not generated, contact the portal’s support team or the relevant transport authority with the transaction ID and payment date.
Tips to avoid delays at the checkpost
- Pay before starting the journey whenever the portal allows advance payment.
- Use only official government websites and secure payment pages.
- Match the vehicle number and travel dates with your documents.
- Keep the receipt accessible offline in case mobile internet is unavailable.
- Check whether a separate permit, challan, toll, or local fee is required.
- Review the latest rules because tax rates and portal procedures can change.
Frequently asked questions
Can I pay checkpost tax at the border?
Some jurisdictions provide an on-site payment option, but online payment is usually more convenient when available. Check the relevant authority’s current instructions before travelling.
Is a payment receipt compulsory?
Keep the receipt or acknowledgement available. Enforcement staff may ask for proof of payment, and it can also help resolve a payment-status dispute.
Does online payment replace a vehicle permit?
Not always. Tax payment and permit compliance can be separate requirements. Confirm both for your vehicle category and route.
Final checklist
Before leaving, confirm that the payment status is successful, the receipt shows the correct vehicle and dates, and all required permits and documents are available. Because checkpost tax rules differ by state and vehicle type, use the current official guidance for the route you are taking.
14:05:24 [mysql] Error: MySQL shutdown unexpectedly.
14:05:24 [mysql] This may be due to a blocked port, missing dependencies,
14:05:24 [mysql] improper privileges, a crash, or a shutdown by another method.
14:05:24 [mysql] Press the Logs button to view error logs and check
14:05:24 [mysql] the Windows Event Viewer for more clues
14:05:24 [mysql] If you need more help, copy and post this
14:05:24 [mysql] entire log window on the forums
WordPress is a powerful content management system that allows you to create and manage your website with ease. One of the key features of WordPress is the ability to add new users and assign different roles and permissions to them. In this blog post, we will guide you through the process of adding a new admin user or user in WordPress.
Step 1: Access the WordPress Dashboard
To add a new user, you need to access the WordPress dashboard. To do this, login to your WordPress website using your admin credentials. Once logged in, you will be redirected to the dashboard.
Step 2: Navigate to the Users Section
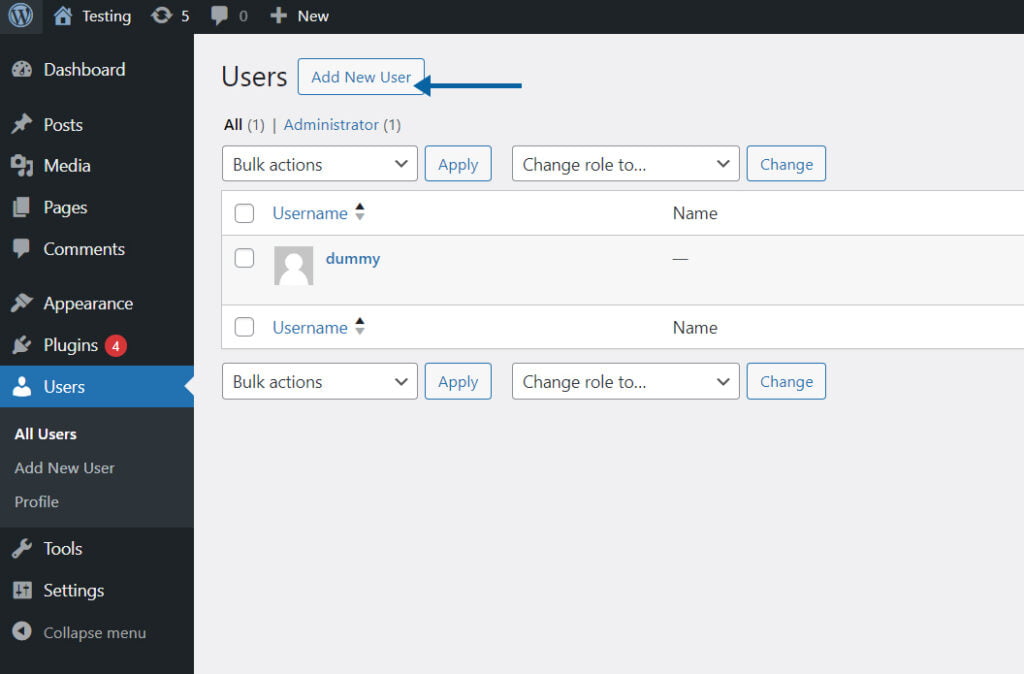
Once you are on the dashboard, look for the ‘Users’ section on the left-hand side menu. Click on ‘Users’ to expand the options.

Step 3: Add a New User
Click on the ‘Add New’ button under the ‘Users’ section. This will take you to the ‘Add New User’ page.
Step 4: Fill in the User Details
On the ‘Add New User’ page, you need to fill in the user details. Start by entering a username for the new user. Make sure to choose a unique username that is not already taken by another user.
Next, enter the email address of the new user. This email address will be used for communication and password reset purposes.
Choose a strong password for the new user. You can either manually enter a password or use the ‘Generate Password’ button to let WordPress generate a secure password for you. Make sure to save this password in a safe place as you will need it to login as the new user.
Provide the first name and last name of the new user. Although these fields are optional, it is recommended to fill them in for better user management.
Finally, choose the role for the new user. WordPress offers several predefined roles such as Administrator, Editor, Author, Contributor, and Subscriber. Select the appropriate role based on the level of access and permissions you want to assign to the new user.

Step 5: Save the User
After filling in the user details and selecting the role, click on the ‘Add New User’ button at the bottom of the page. WordPress will then create the new user and display a success message.
Step 6: Notify the New User
Once the new user is created, it is a good practice to notify them about their account. You can send them an email with their login credentials and instructions on how to access the website.
That’s it! You have successfully added a new admin user or user in WordPress. The new user can now login to the website using their username and password and start using the assigned role and permissions.
Remember to regularly review and manage the users on your WordPress website to ensure the security and integrity of your content.
Effective website quality assurance ensures that your WordPress informative website functions smoothly and provides an excellent user experience. Use this checklist to maintain and improve your website’s quality.
Content Quality:
- Accurate and Updated Information:
- Ensure that all content is accurate and up to date.
- Regularly review and update articles or posts.
- Grammar and Spelling:
- Proofread all content for grammar and spelling errors.
- Use grammar and spell-check tools if needed.
Design and Layout:
- Responsive Design:
- Confirm that the website layout adapts seamlessly to various screen sizes and devices.
- Test mobile and tablet views.
- User-Friendly Design:
- Maintain a clean and easy-to-navigate design.
- Optimize the use of white space for readability.
Navigation:
- Intuitive Menu Structure:
- Ensure that the menu structure is logical and user-friendly.
- Categories and tags should make content easy to find.
- Broken Links:
- Regularly check for and fix broken links within your content.
Page Loading Speed:
- Image Optimization:
- Optimize images for faster loading without compromising quality.
- Use plugins like WP Smush to compress images.
- Caching:
- Implement caching plugins to improve page load times.
- Use browser caching to reduce repeat loading times.
- Content Delivery:
- Consider using a content delivery network (CDN) to deliver content faster to users around the world.
SEO Optimization:
- Meta Tags:
- Optimize title tags, meta descriptions, and headers for search engines.
- Ensure each page or post has a unique and descriptive title.
- Sitemap:
- Create and submit an XML sitemap to search engines to improve indexing.
- Use a plugin like Yoast SEO for better SEO management.
Accessibility:
- WCAG Compliance:
- Make sure your website is accessible to people with disabilities by following the Web Content Accessibility Guidelines (WCAG).
- Use accessibility plugins if necessary.
Security:
- HTTPS:
- Ensure your website uses HTTPS for secure connections.
- Renew SSL certificates before they expire.
- Security Updates:
- Regularly update WordPress core, themes, and plugins to address security vulnerabilities.
- Install a security plugin for additional protection.
- Regular Backups:
- Set up automated backup solutions to prevent data loss.
- Store backups securely offsite.
Testing and Monitoring:
- User Testing:
- Gather feedback from users to identify and address usability issues.
- Conduct usability testing for insights.
- Website Monitoring:
- Use website monitoring tools to track performance and uptime.
- Configure alerts for downtime or errors.
Legal Compliance:
- GDPR and Privacy:
- If applicable, ensure compliance with data protection regulations like GDPR.
- Display a privacy policy and cookie consent notice.
- Content Ownership:
- Verify that all content used is either original or properly attributed.
- Respect copyright laws and intellectual property rights.
Conclusion: By regularly reviewing and improving your WordPress informative website using this checklist, you can ensure it provides a top-quality user experience and remains up to date with industry standards and regulations.
Securing your WordPress eCommerce website is crucial to protect sensitive customer data, maintain the trust of your users, and ensure the smooth operation of your online store. Here are some essential steps to enhance the security of your WordPress eCommerce website:
- Use a Reliable Hosting Provider: Choose a reputable hosting provider that specializes in WordPress hosting. Look for one that offers security features like firewalls, regular backups, and malware scanning.
- Keep WordPress Core, Themes, and Plugins Updated: Regularly update your WordPress core, themes, and plugins to patch vulnerabilities and ensure the latest security fixes. Enable automatic updates whenever possible.
- Strong Passwords and Usernames: Use complex, unique usernames and strong passwords for your WordPress admin, FTP, and database accounts. Avoid using default “admin” usernames.
- Two-Factor Authentication (2FA): Implement 2FA for your admin and user accounts. This adds an extra layer of security by requiring a second authentication method, such as a time-based one-time password (TOTP) or SMS code.
- Limit Login Attempts: Use a plugin to limit the number of login attempts to prevent brute force attacks. This locks out users after a certain number of failed login attempts.
- Use a Web Application Firewall (WAF): Employ a WAF to filter and monitor incoming traffic, blocking malicious requests and protecting your site from common attacks.
- Secure Your Database: Change the default database table prefix (e.g., from wp_ to something unique) to make it more difficult for attackers to target your database. Also, restrict database access to only necessary users.
- Regular Backups: Perform regular backups of your website and database. In the event of a security breach, having recent backups will allow you to restore your site quickly.
- Secure File Permissions: Configure file and directory permissions properly. Limit write permissions to essential folders and files. Most WordPress files should have permissions set to 644, and directories should be set to 755.
- SSL Certificate: Enable SSL (Secure Socket Layer) to encrypt data transmission between your website and visitors. This is crucial for securing payment transactions and protecting user data.
- Disable Directory Listing: Prevent directory listing by adding an empty index.html file to your directories or using a plugin to disable it.
- Disable XML-RPC: If you don’t use XML-RPC, consider disabling it to prevent potential DDoS attacks and brute force attempts.
- Content Security Policy (CSP): Implement a CSP header to prevent cross-site scripting (XSS) attacks and limit the sources from which your site loads content.
- Regular Security Audits: Conduct regular security audits of your website using security plugins or professional security services to identify and fix vulnerabilities.
- User Access Control: Limit user privileges to the minimum required for their roles. Avoid giving admin access to users who don’t need it.
- Security Plugins: Use security plugins like Wordfence, Sucuri, or iThemes Security to enhance your site’s security and get notified of any suspicious activities.
- Monitor for Suspicious Activity: Set up monitoring tools and alerts to be informed of any unusual or suspicious activities on your website.
- Educate Your Team: Ensure your team understands security best practices and how to recognize potential threats like phishing emails and suspicious links.
- GDPR Compliance (or Applicable Data Protection Regulations): If you deal with personal data, make sure your website complies with data protection regulations and provides users with options for consent and data deletion.
- Regularly Test and Update Your Security Measures: Security is an ongoing process. Regularly test and update your security measures to adapt to new threats and vulnerabilities.
By following these security practices, you can significantly improve the security of your WordPress eCommerce website and protect both your business and your customers.
When it comes to owning a car in India, one of the most important things to consider is getting the right car insurance. With so many options available in the market, it can be overwhelming to choose the best car insurance company. In this blog post, we will discuss some of the top car insurance companies in India and what factors to consider when making your decision.
Top Car Insurance Companies in India
1. New India Assurance: With a wide range of coverage options and excellent customer service, New India Assurance is one of the most trusted car insurance companies in India. They offer comprehensive coverage, third-party liability coverage, and a range of add-on covers to suit your needs.
2. ICICI Lombard: Known for its hassle-free claim settlement process and quick response time, ICICI Lombard is another popular choice for car insurance in India. They offer a range of plans with attractive features such as cashless repairs, roadside assistance, and coverage for personal accidents.
3. HDFC ERGO: With a strong presence in the market, HDFC ERGO offers comprehensive car insurance plans that provide coverage for both own damage and third-party liability. They also offer add-on covers like zero depreciation and engine protection.
Factors to Consider
When choosing the best car insurance company in India, here are some factors to consider:
- Coverage: Look for a company that offers comprehensive coverage for both own damage and third-party liability. It is also important to check if they offer add-on covers like zero depreciation and engine protection.
- Claim Settlement Ratio: The claim settlement ratio indicates the percentage of claims settled by the insurance company. Look for a company with a high claim settlement ratio as it indicates their reliability and promptness in settling claims.
- Customer Service: Good customer service is essential when dealing with car insurance. Look for a company that has a reputation for excellent customer service and quick response time.
- Network Garages: Check if the insurance company has a wide network of cashless garages where you can get your car repaired without any hassle.
- Premium: Compare the premium rates offered by different insurance companies and choose one that offers the best value for money.
By considering these factors and doing thorough research, you can choose the best car insurance company in India that meets your needs and provides you with the peace of mind you deserve.
Introduction
As we move into the new year, it’s important for web designers to stay ahead of the curve and be aware of the latest trends in the industry. In this blog post, we will explore some of the key web design trends that are expected to dominate in 2023.
1. Dark Mode
Dark mode has been gaining popularity over the past few years, and it’s expected to continue its rise in 2023. With its sleek and modern look, dark mode provides a visually appealing experience for users. It also helps reduce eye strain and saves battery life on devices with OLED screens. Incorporating dark mode into your web design can give your website a cutting-edge and sophisticated feel.
2. Minimalism
Minimalism has been a popular web design trend for quite some time, and it’s not going away anytime soon. In 2023, we can expect to see even more minimalist designs with clean lines, ample white space, and simple color schemes. By removing unnecessary elements and focusing on the essentials, minimalist web design creates a user-friendly and clutter-free experience.
3. Microinteractions
Microinteractions are subtle animations or visual cues that provide feedback to users when they interact with a website. These small details can make a big difference in user engagement and overall user experience. In 2023, we will see more web designers incorporating microinteractions into their designs to add a touch of interactivity and delight to their websites.
4. 3D Elements
With advancements in technology, 3D elements are becoming more accessible and easier to implement in web design. Adding depth and dimension to your website can create a more immersive and engaging experience for users. Whether it’s 3D illustrations, animations, or interactive elements, incorporating 3D elements into your web design can make your website stand out.
5. Voice User Interface
Voice user interface (VUI) is a technology that allows users to interact with a website or application using voice commands. With the rise of virtual assistants like Siri and Alexa, VUI is expected to become increasingly popular in 2023. Incorporating voice commands into your web design can provide a more convenient and hands-free experience for users.
Conclusion
As we look ahead to 2023, these web design trends are set to dominate the industry. By staying up-to-date with these trends and incorporating them into your designs, you can create modern, user-friendly, and visually appealing websites. Remember, staying ahead of the curve is essential in the fast-paced world of web design.
In this fast-paced digital age, staying abreast of the latest technology trends is essential for individuals and businesses alike. Let’s delve into the most influential tech trends that are shaping our world today.
Embracing Artificial Intelligence (AI)
Artificial Intelligence, or AI, is revolutionizing industries across the board. From enhancing customer service with chatbots to optimizing supply chains, AI is a game-changer. Its data-driven insights and automation capabilities are improving efficiency and decision-making.
The Power of Blockchain
Blockchain technology is no longer just synonymous with cryptocurrencies. It has transcended these roots to offer secure and transparent solutions in various sectors. Businesses are leveraging blockchain to ensure data integrity, streamline transactions, and enhance trust in their processes.
5G Connectivity Unleashed
With the widespread rollout of 5G networks, the world is experiencing a connectivity revolution. This technology enables lightning-fast data transfer and ultra-low latency. As a result, it’s paving the way for innovations like augmented reality and the Internet of Things (IoT).
Internet of Things (IoT) in Everyday Life
The Internet of Things, or IoT, is connecting our daily lives like never before. Smart homes, healthcare devices, and even city infrastructure are becoming “smart.” IoT’s potential to enhance convenience, efficiency, and sustainability is staggering.
Sustainable Technology for a Greener Tomorrow
In the age of environmental consciousness, sustainable technology is a prominent player. Innovations in solar energy, electric vehicles, and eco-friendly materials are making strides towards a greener future. The marriage of technology and sustainability is vital for our planet’s well-being.
Your Role in Embracing Tech Trends
As technology continually evolves, embracing these trends becomes a necessity, not a choice. AI, blockchain, 5G, IoT, and sustainability are the building blocks of the future. They hold the potential to reshape industries, improve our lives, and protect the environment.
So, are you ready to step into the world of the latest technology trends? Dive in, explore, and be a part of the transformation. It’s an exciting journey, and it’s happening right now.


 See all settings.
 .
 .
